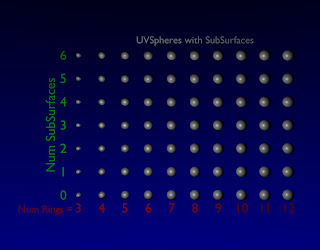
 In Blender, one of the ways to improve the smoothness of an object is to use subsurfaces. Programatically, this is done by changing the modifiers attached to an object. In this example, a UVsphere is modified by changing the number of rings and segments. The same basic UVsphere is also modified by adding subsurface levels. From looking at the table, it is possible to see how increasing subsurface level and rings/segments both get a smooth looking sphere.
To get this example to run, you will need to copy the Data Origami Library rev 0.001 to C:\tmp (or modify the path to point to your location of choice).
Code:
Download Code to draw the spheres with different rings, segments and subsurface levels.
#BPY
__doc__ = """
Sphere Subsurface Example
Rev 1.0
This script demonstrates the effect of subsurface.
This script depends on the Origami Library and expects it to be located at C:\tmp.

This script is executed at the command line by:>blender -P subsurf_ex_XXXX.py"""

__author__ = "edt"
__version__ = "1.0 2009/08/03"
__url__="Website, dataOrigami.blogspot.com"

##############################################################


import sys
# make sure a copy of OLib_001.py is at C:\tmp
# add to the system path to point to the file to import
sys.path.append("c:\\tmp")

import OLib_001 as MyLib
import Blender
import Blender.Mathutils
from Blender.Mathutils import *
from Blender import *

image = MyLib.Image('MyScene')
image.lookFrom(3.5,3,15)
image.lookAt(3.5,3,0)

image.addText(text='UVSpheres with SubSurfaces',width=5,height=1,
   location=[5,6.5,0],align='MIDDLE')

xList = range(0,10)
ringList = [3,4,5,6,7,8,9,10,11,12]
segmentList = ringList

image.addText(text='Num Rings =',width=10,height=0.4,
   location=[-0.25,-0.75,0],align='RIGHT',
   color=[1.0,0.0,0.0])
ob=image.addText(text='Num SubSurfaces', width=20,height=0.4,
            location=[-1,3,0],align='MIDDLE',
   color=[0.0,1.0,0.0])
ob.setEuler(0,0,90*3.1415/180.0)
for i in range(0,len(ringList)):
 rings = ringList[i]
 segments = segmentList[i]
 image.addText(text=str(rings),width=1,height=0.4,
    location=[xList[i],-0.75,0],align='MIDDLE',
    color=[1.0,0.0,0.0])
 for subSurfLevel in range(0,7):
  # add a UVsphere
  UVSphereOb = image.addSphere(diameter=0.5,rings=rings,
   segments=segments,location=[xList[i],subSurfLevel,0])
  mods = UVSphereOb.modifiers
  mod = mods.append(Modifier.Types.SUBSURF)   # add a new subsurf modifier
  mod[Modifier.Settings.LEVELS] = subSurfLevel # set subsurf subdivision levels to 3
  image.addText(text=str(subSurfLevel),width=1,height=0.4,
  location=[-0.5,subSurfLevel-0.2,0],align='RIGHT',
  color=[0.0,1.0,0.0])

image.save('SubSurfaceExample.jpg')
To copy the code snippets easily, see:http://dataorigami.blogspot.com/2009/06/how-to-easily-copy-code-snippets-from.html
To execute the script in Blender, see:http://dataorigami.blogspot.com/2009/06/how-to-execute-script-from-command-line.html
To work with the script in a simple IDE, see:http://dataorigami.blogspot.com/2009/04/developing-scripts-for-blender.html
No comments:
Post a Comment