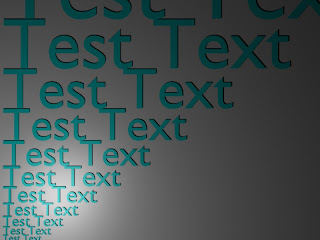
 This example shows how to size and place text arbitrarily in the Blender environment. The Blender API offers a function to size text, however, it is limited to a minimum range of '0.1'. For some applications this limitation is undesirable. This example includes a function, 'textInBox', which generates the text so that it fits in a box of given height and width. So the box can be arbitrarily sized, the function converts the text into a mesh, find the size of the mesh, then scales the text to fix in the box. One key aspect of this example which is not obvious, is that in order to correctly use the 'getBoundBox' function to determine the size of a mesh, the screen needs to be redrawn using 'Window.RedrawAll()'. If this is not done prior to using 'getBoundBox', the bounding box returned will be incorrect.
Code:
#!BPY

__doc__ = """
SizeAndPlaceText01.py

Example demonstrating the following techniques in Blender 2.48:
1) Sizing and placing 3-D Text
2) Using the setLocation functions

This script is executed at the command line by:
>blender -P sizeAndPlaceText01.py
"""
__author__ = "edt"
__version__ = "1.0 2009/07/01"
__url__="Website, dataOrigami.blogspot.com"


##############################################################
# load the modules used in the script
import Blender
import bpy
from Blender import *
from Blender.Scene import Render
from Blender import Text
from Blender import Mathutils
from Blender.Mathutils import *
import math

##############################################################
# define function(s)

def scrubScene(saveList=[]):
 'removes all objects in scene, except objects in save list'
 scene = Scene.GetCurrent()
 for ob in scene.objects:
  if not ob.getName() in saveList:
   scene.objects.unlink(ob)

def textInBox(txtStr="defaultText",col=[1.0,1.0,1.0],width=1.0,height=1.0):
 txt = Text3d.New()
 txt.setText(txtStr)
 txt.setSize(0.1)
 mat=Material.New('textMat')
 mat.rgbCol = col
 ob = scene.objects.new(txt)
 me = Blender.Mesh.New('textMesh')
 me.getFromObject(ob)
 me.materials += [mat]
 scene.objects.unlink(ob)
 newOb = scene.objects.new(me)

 # force a redraw to ensure that the bounding box is updated!!
 Window.RedrawAll()
 boundBox = newOb.getBoundBox(1)
 upperBox = max(boundBox)
 lowerBox = min(boundBox)
 initialWidth = upperBox[0]-lowerBox[0]
 initialHeight = upperBox[1]-lowerBox[1]
 widthRatio = width/initialWidth
 heightRatio = height/initialHeight
 ratio = min(widthRatio,heightRatio)

 newOb.setSize(ratio,ratio,ratio)
 return newOb


##############################################################
##############################################################
# clean out any objects from the scene
scrubScene()
scene = Scene.GetCurrent()

##############################################################
# add a camera and set it up
#
camdata = Camera.New()
cam = scene.objects.new(camdata)
# use setLocation to control the position of the camera
cam.setLocation(10.0,8.1,20.0)
# use set Euler to control the angle of the camera
cam.setEuler(0*(3.1415/180),0*(3.1415/180),0*(3.1415/180))
scene.objects.camera = cam
##############################################################
# add a lamp and set it up
#
lampData = Lamp.New()
lampData.setEnergy(1.0)
lampData.setType('Lamp')
lampData.mode |= Lamp.Modes["RayShadow"]  # make shadows appear
lamp = scene.objects.new(lampData)
lamp.setLocation(2.0,2.0,9.0)
lamp.setEuler(120*(3.1415/180),30*(3.1415/180),-30*(3.1415/180))

##############################
# create different size text at different locations
#
# start at origin and move upward
yLoc = 0.0
size = 0.1
for i in range(0,20):
   ob = textInBox('Test Text',[0.0,1.0,1.0],1e9,size)
   ob.setLocation(1.0,yLoc,0.0)
   yLoc = yLoc + size + 0.005
   size = size * 1.25
##############################
# create a background so you can see that everything is at same z level
mat = Material.New('xyBackMat') # create a new Material called 'newMat'
mat.rgbCol = [1.0, 1.0, 1.0]      # change its color
xyBackMe = Mesh.Primitives.Grid(2,2)
A = Matrix(
 [10.0,0.0, 0.0 ,0.0],
 [0.0,10.0, 0.0 ,0.0],
 [0.0,0.0, 10.0 ,0.0],
 [10.0,10.0,-0.05,1.0])
xyBackMe.transform(A,True)
xyBackOb = scene.objects.new(xyBackMe,'xyBackMe')
xyBackOb.getData(False,True).materials += [mat]
# this makes the grid appear as an outline in the Blender editor
#xyBackOb.setDrawType(Object.DrawTypes["WIRE"])

#######################################
# render the image and save the image
context = scene.getRenderingContext()
# enable seperate window for rendering
Render.EnableDispWin()
context.imageType = Render.JPEG
# draw the image
context.render()
# save the image to disk
# to the location specified by RenderPath
# by default this will be a jpg file
context.saveRenderedImage('SizeAndPlaceTextExample001.jpg')

Window.RedrawAll()
#
########################################
To copy the code snippets easily, see:http://dataorigami.blogspot.com/2009/06/how-to-easily-copy-code-snippets-from.html
To execute the script in Blender, see:http://dataorigami.blogspot.com/2009/06/how-to-execute-script-from-command-line.html
To work with the script in a simple IDE, see:http://dataorigami.blogspot.com/2009/04/developing-scripts-for-blender.html
No comments:
Post a Comment